
Native to the Arctic and nearby areas, the polar bear is a beast that weighs 300-800 kg. This apex predator with striking white coat has an imposing presence. As its population is confined to specific regions, the polar bear becomes one of the most captivating subjects for wildlife photography. This animal thrives in an extreme environment. Photographing polar bears in their natural habitat is a dream of many wildlife photography enthusiasts. To photograph polar bears, you need to join one of the expert-led photography trips, as capturing the essence of a polar bear requires careful planning, the right equipment, and ethical practices. Here’s your guide to success.
Ideal Locations for Polar Bear Photography
The Arctic offers several prime destinations for photographing polar bears. Key locations include:
Churchill, Canada
Dubbed the “polar bear capital of the world,” this Manitoba town provides reliable sightings, especially in October and November during the bears’ migration to hunt on the ice.
Svalbard, Norway
The remote archipelago offers a dramatic backdrop of glaciers and fjords, best explored via boat tours in the summer.
Kaktovik, Alaska
A small Inupiat village where polar bears congregate in autumn, drawn by whale carcasses and thinning sea ice.
These locations provide excellent opportunities for capturing polar bears against stunning Arctic landscapes.
The Best Time to Photograph Polar Bears
Timing your visit is essential. Polar bears are the most active:
In Autumn (October–November)
As sea ice forms, polar bears migrate along predictable routes, providing consistent sightings.
During Summer (July–August)
Bears rest onshore as the ice melts, offering close observation opportunities, particularly in places like Svalbard.
Early morning and late afternoon light during these seasons enhance your photos with soft, golden tones.
Gear Essentials for Polar Bear Photography
To capture the best shots in challenging Arctic conditions, pack:
Telephoto Lenses
A 300-600mm lens is ideal for maintaining a safe distance while capturing detailed close-ups.
Wide-Angle Lenses
Perfect for incorporating the polar bear’s icy surroundings into your frame.
Tripod
Essential for stability, especially in low light or windy conditions.
Cold-Weather Accessories
Insulated gloves, lens hoods to prevent glare, and weatherproof bags to protect gear from snow and moisture.
Carry extra batteries, as the cold can drain them quickly. Use silica gel packs to prevent condensation when moving between temperatures.
Understanding Polar Bear Behavior
To capture natural behaviors, learn how polar bears interact with their environment:
Hunting
Look for bears near the ice edge or seals’ breathing holes. Their focused stalking behavior makes for dynamic shots.
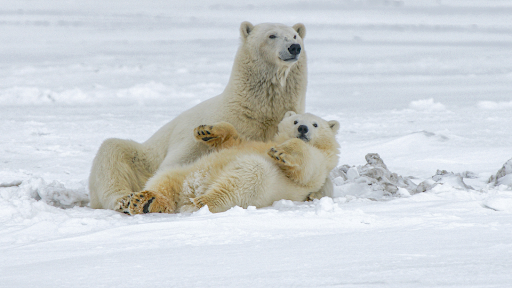
Social Interactions
During mating season or mother-cub bonding moments, their interactions can be incredibly expressive.
Resting
Polar bears lounging on ice floes or snowbanks provide serene, picturesque scenes.
Always observe from a safe distance, typically 300 feet or more, to avoid distressing the animal or putting yourself in danger.
Maximizing Composition and Light
A compelling polar bear photo is not just about the animal; it’s also about the composition and lighting:
Rule of Thirds
Position the bear off-center to create visual interest.
Include the Environment
Capture sweeping icy landscapes, glaciers, or the aurora borealis in the background for context.
Golden Hours
Early morning and late afternoon light enhances textures in the snow and the bear’s fur.
Pay attention to the direction of light. Side lighting can highlight the bear’s form, while backlighting creates dramatic silhouettes.
Ethical Wildlife Photography
Respect for wildlife and the Arctic environment is paramount.
Do Not Disturb
Use telephoto lenses to maintain distance. Avoid loud noises or rapid movements.
Follow Local Guidelines
Many regions have strict wildlife protection laws. Guided photo tours typically enforce these to minimize human impact.
Leave No Trace
Avoid littering or altering the environment in any way.
Your goal should be to observe and document without disrupting the polar bear’s natural behavior.
Benefits of Guided Photo Tours
If you’re new to Arctic photography or polar bear tracking, consider joining a professional photo tour. These trips are led by experienced guides who:
- Know the best locations for sightings.
- Provide safety tips and ensure ethical practices.
- Offer workshops on settings, composition, and lighting for optimal results.
Joining a group also reduces the logistical challenges of Arctic travel, allowing you to focus on your craft.
Post-Processing Tips
Editing is a crucial step in polar bear photography. Use software like Adobe Lightroom or Photoshop to:
- Enhance contrast and sharpness to highlight the bear’s fur and the Arctic textures.
- Adjust the white balance to correct for snow glare and emphasize natural tones.
- Crop thoughtfully to remove distractions while preserving the bear’s presence in its environment.
Strive for authenticity; let the images reflect the raw beauty of the Arctic.
Conclusion
Photographing polar bears is a once-in-a-lifetime experience that demands preparation, patience, and respect for nature. By choosing prime locations, equipping yourself with the right tools, and adhering to ethical practices, you can capture breathtaking images that celebrate the majesty of these Arctic giants. Whether through independent photography trips or professionally guided photo tours, your journey will yield unforgettable memories and photos to cherish forever.
For more information visit : articlepoint.org
Comments are closed.